Wednesday 30 October 2013

Making Our Own Flowers

Time for another challenge at Crafting with Dragonflies and this one is to


Create your own Flower Embellishments
 Tell us how or what you did, and if you can add a link great!


You can just have the flowers or put them on something, the sky is the limit, up to you, card, scrap page, box or on their own....made from paper, fabric, gauze, leather, old books, anything....

Our Sponsor for this challenge is Emerald Fairies

The winner will receive two images


For another blog called the Lollipop Ladies, where there is a photo and a twist each fortnight, I made a flower brooch last week.  You can find out all about it here.

For Crafting with Dragonflies I decided to upcycle a balsa wood cheese box, and add the brooch as a topper. 


I painted it with white Gesso to cover up the printing - this is a lovely cheese if you see the box, a beautiful Camembert:  King Island is in Bass Strait between us and the mainland of Australia and is a beautiful place to visit, but if you cannot afford to do that, buy the cheese!


It took three coats of paint to cover it up enough to begin work on it


Like my orchard?  
I used a die cut and adhered it to the centre of the inside bottom of the box, and then added a rub-on. 


I used a piece of washi tape around the outside of the lid of the box. I also die cut another blue piece of card  from the Firefly set and fitted it to the top of the box.  I added the brooch topper and a small tag with another rub-on. 


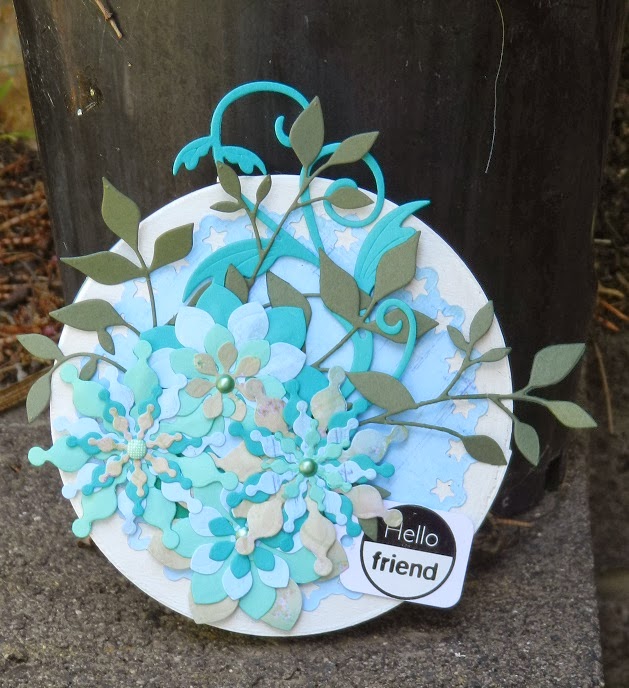
I thought I could fill it with die cut  flowers as a gift for a friend. 


I had several flowers left over from making the brooch, and was flicking through a new magazine I saw a flower created by folding small squares of paper into cones, and using them as the petals.  So I had a go at that as well. Each petal is one 5 cm x 5 cm square.


I used Firefly DP by Prima, a die cut tag, mounted the back paper onto SU Bermuda Bay card, and then onto some pearl card folded to make a card. 


Initially I tried to work out a good way to fold the cones, and two got a centre fold before I realised that would not work! However, eventually I got it sorted but there are some odd folds in there in places. I added some dots of Liquid Pearls (gold) and I sprayed it all with a gold glitter spray - you can see it under the desk  light inside but it doesn't show in the photos taken outside so well. 


The sentiment is from the SU Happy Day set. 

Hope this gets you inspired to enter our challenge (and even to enter the one at the Lollipop Ladies too if it is still running when you read this), and make a flower embellishment.

I will enter these in the following challenges:
Crafty Sentiments Designs: Anything Goes - the box
Through the Craft Room Door: Anything Goes - the card
Artistic Stamper: Alter something - the box obviously
The Crafting Cafe: Anything Goes - the card


Sunday 27 October 2013

My Messy Craft Space

Hilde, our fearless leader over at Crafting with Dragonflies, has asked us to take some photos's of our craft area and talk about them a little. Well, this set me to reorganising my space a bit and cleaning up before I took the photo's but I did take some photo's of the messy bits as well! However I have decided not to include these as the posting is already quite long.

Lots of reading here - so maybe a cuppa?

Before I show you this space, I should say I started off at a very small desk build into a wall in the second bedroom. I graduated from that to several card tables and my husband kindly made me a big pine table to sit and work at. I still have that table! Eventually, I outgrew that room - primarily as it is still a guest bedroom, and has a wall of wardrobes! After I retired, I descended to my working space downstairs, where my computer was already set up at the big desk my hubby had made for me when we were first married. I have spent many hours over the years at this desk - firstly marking and preparing lessons, then working on the computer as well and now just blogging and doing the occasional obligatory paper work!

I gradually filled this area - I had bought home from work my standing desk so that joined the other desk and the table. I then got a flat pack cupboard and set of drawers and that was the beginning.  I should also say that hubby built the bookshelves for my library of both work books and fiction, and that these too have grown until there is almost no wall space that is not covered in bookshelves!

So, welcome to my world.

I am downstairs under the main living space with a spiral staircase between. Hubbies wood-working workshop is on the other side of the wall behind the main (computer) desk. He has a part of this space too for his desk and filing cabinets, and some shelving. There is a bathroom and wine storage area (in the shower!) between the two spaces! So, if I need a break......

Just outside the floor-to-ceiling windows is the bottom garden, and the bay, and the hills across the bay. Good inspiration. 
Between the glass walls (windows) to outside I have squeezed this cupboard and drawers.  Paper storage either side and the middle is mostly ribbons plus embellishments. I am going up and up and have almost obscured a lovely crayon drawing I purchased of a ketch in Ireland. Need to lift it a bit higher perhaps? Drawers contain mostly wooded stamps.

Turn right and you see the table hubby first built me to craft on.  Covered with stuff most of the time now. Note the ink storage on rhs - hubby built that too. VERY sturdy and heavy (like all his work!). Under this table is more paper storage, mostly. I use big plastic bins for SU card. The plastic drawers have Momento inks, and current SU ones. The round container has sponge bits for each ink colour stored in it. Behind the plastic is a basket of punches.


On the lhs of the table are two CD towers containing all my non-SU plastic stamps - its full! I store these in SU plastic cases.  Ribbons cascade off this on one side. 


Inside the cupboard is more ribbon (top shelf), re-inkers and TH's inks, pencils and stuff Bottom shelf has chipboards, washi tapes, useful stuff......and paints! Door hanging is sprays and daubers and stuff.....


Turn left and you look at my standing desk where I work (back problems) and it is hard to make out what is what because my hubbies desk and shelves are over the back. The boxes with the x's were made by John to hold my Copics but that collection grew too big so now I have a big black canvas box/bag thing for them and they are stored under the table.  LHS has paper flowers, black box has photos, the RHS has a basket of useful paper bits.  Shelf under has my cutters and rulers, and bling boxes and some extra card and the baskets hanging below that have (lhs) die cuts and similar and (rhs) white card.  The plastic file has embossing powder/tinsel stuff on top and in the top three drawers; then flowers and the bottom purple two are wooden bits and lace.

Under the table is a mess!


Put your back to the cupboard and you look at the internal wall. Shelving has SU cling stamps; boxes of letters; the sentiment sticker collection - the rest of the stickers is on the far wall. The green canvas basket has punches (behind the computer screen). 


Under the desk are the Christmas supplies and the sewing machine!


The wall behind the stair has the wooden SU stamp sets, the extra ribbon, the card stock, made-up items, my painting gear, more die-cuts in baskets, more stickers, albums.....magazines, sewing gear.....small paper pads and in another plastic wheelie on floor that you cannot see, there are other paper pads and freebie papers from magazines.


To the left of this is another cupboard set, with the Big Shot on top and more dies and embossing folders. My Cuttlebug is in the cupboard. The book shelves here hold mostly non-fiction books.  There is a row of MS punches of course. This cupboard has my SU business stuff and lots of supplies and thing needed to assist me in my crafting! The mess on the rhs is made up of w/c painting pads, boxes and things too good to throw away. The easles for painting are in the corner. The lhs is the printer on another cupboard made for me by John. He really is a lovely man. It also houses the computer tower and paper for the printer. I have nearly run completely out of room, and space, and must begin to curtail the spending and start to use up of dispose of the surplus. I do talk a good talk of course.....................


Saturday 26 October 2013

Lollipop Ladies go Off the Page


LOLLIPOP LADIES Challenge #79 
Cookie Monster cupcake with the added challenge of Off the Page
 

Sweet but not lollies this time!

Guest DT spots are able to be won each fortnight

and our sponsor this fortnight is: Mad for Markers*
(thanks to Sammi).


A choice of 3 of her M4M digi stamps.
Prize will only be offered if 7 or more entries partake in the challenge.

My take on this is is from an idea I got out of the magazine Cardmaking and Papercraft No 121.  When I saw this in the magazine I just had to have a go, but mine is not as gentile as theirs!


What is it - a brooch! It is made from die-cut flowers and card.  Mine is also made from card and DP.  I have used a magnet to attach it to the jacket - and therefore it can also be a fridge magnet! (or similar).

 Here is mine - I used the die cuts from the Crealies Creative Flowers No 10 and 11.  The foliage behind is from Memory Box - Fresh Foliage and Cherry Lynn designs - Tropical Flourish. The card is all from SU and the scrap DP is from the Firefly set by Basic Gray.


This is just on the bedspread. I looks quite good against the white. 


This is attached to the door of the fridge (stainless steel)


I think the foliage is probably going to get crushed and I should have stuck to just the flowers or shorter foliage but it just looked so pretty. 


Friday 18 October 2013

Crafting with Dragonflies Challenge 13

ED: I have been without internet for THREE days - not sure if it was due to the high winds and wild weather we have been experiencing but the internet line went down on Wednesday morning (or Tuesday night). Getting Telstra to do anything in a hurry is difficult as they have few technicians these days and all the call centres/help centres are overseas. Nice people but really hard to deal with when they are not here.....as a consequence, my posting is late! My fault - I left it to the last minute to do some correcting, and didn't schedule!
Firstly, a big warm welcome to our two new teamies at Crafting with Dragonflies 

Say hi to Sammy


and

and a big hello to Wynn

I know you will love their work. I do already!

Secondly, there is no sponsor this fortnight, so we can use our own images or stash! Sometimes that freedom is good and this is one of those times! Hilde is providing the prize for the winner and it is a surprise! 
Today, I am sharing a card for Crafting with Dragonflies - the theme for this challenge is trees/ leaves/create a scene: I have made two cards, one twice! I started off with a piece of SU shiny white card, and added some Tim Holtz Distress Ink of various colours in the yellow and greens.  I then used my sprays and sprayed the card to get a lovely shimmer going.  I then die cut out some leaves using a leaf die from a set by Marianne Creatables. I cut out lots of leaves, thinking I wouldn't use them all but I just kept adding and adding.....


I took a piece of SU Sahara Sand card, put it through the crimper, and created a corrugated card. I swiped around the edges of this with Baked Brown Sugar ink (SU), wrapped a piece of SU seam binding ribbon around it, and mounted it onto a piece of Crumb Bake (SU) , and then Pistachio Pudding (also SU). The whole was then placed onto a piece of folded card (SU Cherry Cobbler).  I stamped the sentiment, taken from an SU set called Sassy Salutations, using SU ink - Chocolate Chip. As I said I layered and layered up the leaves, trying to create a scene of them falling in the wind! We have had lots of wind here lately!


I was not that happy with it - before the maroon ribbon was added,  I had a new SU wide ribbon, in grey and brown tones, but it was too cool for the look I wanted, so removed that and added the other for some warmth. I tried to shape the leaves too for some dimension.


Here is the other one - which one do you like best? Not as many leaves on this one either. I was still not that happy, and so created another card for the challenge - but don't like this one much either - too busy or something.......


This stamp is from Crafty Individuals - 197

There is a lot of use of embossing powder going on here. I used up the rest of the treated shiny white card from the leaves - black, gold and white embossing powder was used for the various stamps, and I added Copics to the berries first, and some green to the white holly leaves. I used a Thinlit die cut from SU Merry - from gold card. The whole is layered onto some SU Gold card, and then onto some Cherry Cobbler (SU). I added some red Stickles to the berries to make them sparkle.


I would be interested to see what you think. My opinion is that this is too busy and the white EP is too stark.


Monday 14 October 2013

Kitty Lane Number 4

The last of the Kitty Lane stamps to show you today.  These are such great stamps.

The first one is called So You Think You Can Dance? Isn't that appropriate! It is a silhouette stamp, and I used a bit of Copics to highlight the dancers, but left them mostly black and white. Again they were sort-of-fussy-cut and mounted onto the card front.  There is a lot of Liquid Pearls used here to dot around.


The sentiment stamp is one I have had for a very long time from My Stamps.  Again I utilized the Copics pens. This was stamped using Memento Black Ink, onto SU Whisper White, and mounted on SU Black. A string of Liquid Pearl dots down the side was also added.


You cannot see clearly, but the black underneath the image is a piece of patterned flocked vellum, and it is mounted onto some SU More Mustard. Kitty sent me three sheets last time and I have used two to them now - delicious. I did remember this time to place it onto some double sided sticky JAC style paper! 


The whole is then on some pearlised card folded to make a blank square. 


My second and the last of the Kitty Lane stamps, is this one called CowboysWagon. It is a western theme image, so I went with that. Again, I used the Copics to colour, and sort the image as it is a bit detailed.The cows seemed to be grazing so I gave them some greener grass to eat than that on the hills. 


I used a frame from Merci to make it look as if it had been painted and framed. I coloured the red hearts on the frame with Copics. 


I then stamped out and coloured in both the horseshoe and the boots from a set by MFT called Wild, Wild West and fussy cut them out. I popped them up and just slid the horseshoe around the boots. I have used silver Stickles too on the horse shoe and the spurs on the boots. 


The sentiment comes from MTV too.


The whole is put onto some SU Garden Green and then attached to a blank black pearlised card.  


A card for a man. 

I will be entering these in the following challenges:
Challenges4Everybody:  Anything Goes
Scribble and Scrap: Anything Goes
Drunken Stampers: Carnival - the dancers!
Inkspirational: Anything Goes
Southern Girls: Sing a Song - Rock Around the Clock!


Saturday 12 October 2013

Lollipop Ladies and Jubes

Jubes...
Always like a jube to chew on - they have been around for years and years it seems. Quite vintage in fact! That's why the twist for this fortnight is VINTAGE!

The challenge at the Lollipop Ladies  is to be inspired from this photo - colours, shapes, whatever........then add the twist and create a crafted item to suit! 


Guest DT spots are able to be won each fortnight

and our sponsor this fortnight is: Mad for Markers*
(thanks to Sammi).


A choice of 3 of her M4M digi stamps.

Prize will only be offered if 7 or more entries partake in the challenge.


My take for this - I used some of the colours for my inspiration but the red and the green and the darker red were the ones that hit me in my eyes, I got the yellow in there too! It is the poinsettia flower from the SU set called Joyful Christmas. I have coloured this using SU markers and a blending pen. The flower is embossed using Ebony EP (which has a lovely sparkle) and the paper is the SU Confetti card. The folder is decorated with scraps from the Christmas box. The folder itself is made from SU Primrose Petals.


The flower is fussy cut and added to a small decorated folder. I have also stamped a second image and cut the center out and decoupaged that onto this flower. I decorated a small peg with some scrap paper too, and added it because I saw a friend (Ina) had done this and tried it. This folder comes from a Splitcoast tutorial, and I was made aware of it due to the Crafting with Dragonflies current challenge to create a box with at least three cards. Both Ina and Kelli have made this folder but they look so different because of the decorations. Mine looks different again. 


Inside the folder are two pouches, and inside the pouches are four cards (2 each pouch); I have stamped the image slightly off the page for three of the four cards; masked to stamp in some leaves and have coloured them up the same way as the front flower.  I have stamped the sentiment from the same set, using SU Gumball Green ink. 


Here is a close-up of each card


I then decided to use the same set on a muslin bag, and I had seen a tutorial regarding decoupaging onto fabric using tissue, so I used that technique.  You stamp onto the tissue paper (I used StayzOn black ink) , and I used masking again to add the leaves. Fussy cut the tissue and then in the video I watched, she used Modge Podge, but I just used Craft glue to paint the back of the tissue. Before progressing I made a cardboard-wrapped-in-baking-paper wedge to insert into the bag. Then I laid the bag onto the wet tissue and used my brayer to adhere the tissue to the bag - you could try to pick it up and place it, but I saw this in the video and though what a good idea! 


Once on the bag, while the glue was drying, I used a paintbrush to draw some ink away from the edge of the image - the ink I used here is SU Pool Party  - and I stamped the sentiment using StayzOn black. I wanted a slightly vintage look so used a sponge to continue drawing the ink towards to rest of the bag, and then wiped the edges of the bag with SU Spun Sugar ink for a distressed look. 


I then carefully painted a top coat of glue onto the image and went and had a cuppa while it dried. I used the heat gun too, when I came back to complete the drying a bit more. Then I just coloured it up with the SU markers  - the glue seems to take this quite well and draw the ink into it - it needs to dry so don't touch it too much or it will smudge. The colours are much stronger than the marker/blender way of colouring. Deeper. 


Then just let it dry. 


I did stamp off the edge and trimmed the edges of the image so it would sit on the corner better. 


All the items!

I will enter the following challenges:

Brown Sugar: Anything Goes - the folder card set.
Christmas Stamping : Keep it simple  - the muslin bag (no embellies)
Creative Corner:  Anything but a card - the bag
Make it Monday: the folder and the card set